
🔧 所需组件
- Arduino的 (例如 Uno)
- SG90伺服电机
- 电位器 (例如,10kΩ)
- 两个按钮
- 跳线和面包板
📌 接线图
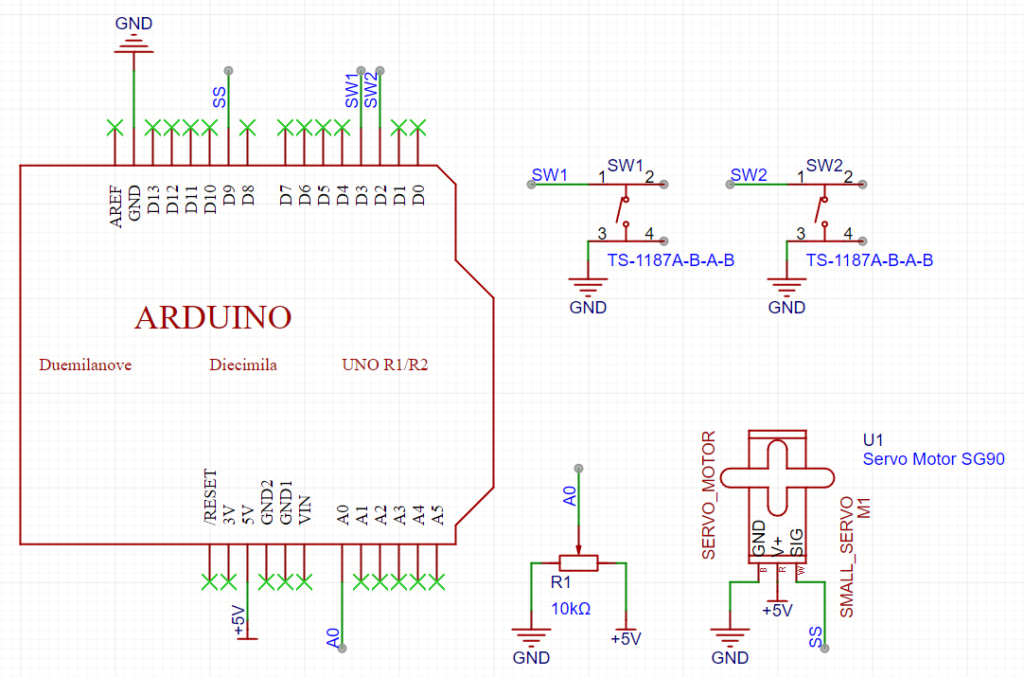
1. 伺服连接(SG90)
- VCC (红色的): → Arduino 5V
- GND (棕色/黑色): → Arduino GND
- 信号(橙色): → 数字化 Pin 9
2. 电位器连接
- 一个外 Pin: → Arduino 5V
- 其他外衣 Pin: → Arduino GND
- 中间 Pin (雨刮器): → 模拟 Pin A0
3. 按钮连接
- 按钮 1(增加角度):
- 单一终端 → 数字化 Pin 2
- 其他航站楼 → GND
- 按钮 2(减小角度):
- 单一终端 → 数字化 Pin 3
- 其他航站楼 → GND
提示: 将按钮模式设置为使用 Arduino 的内部上拉电阻 输入上拉.
💻 示例代码
下面是一个示例草图,它使用电位器作为基准角度,并允许使用两个按钮进行调整:
#include <Servo.h>

Servo myServo;  // Create a servo object

// Pin Definitions
const int servoPin = 9;        // Servo signal pin
const int potPin = A0;         // Potentiometer analog input
const int buttonUpPin = 2;     // Button to increase angle
const int buttonDownPin = 3;   // Button to decrease angle

int servoAngle = 90;  // Starting at the middle position (90°)

void setup() {
  Serial.begin(9600);
  myServo.attach(servoPin);  // Attach the servo to the defined pin

  // Set pin modes for the potentiometer (default INPUT) and buttons
  pinMode(potPin, INPUT);
  pinMode(buttonUpPin, INPUT_PULLUP);    // Enable internal pull-up resistor
  pinMode(buttonDownPin, INPUT_PULLUP);

  myServo.write(servoAngle);  // Set initial servo position
}

void loop() {
  // 1️⃣ Read the potentiometer value and map it to a 0-180° range
  int potValue = analogRead(potPin);
  int mappedAngle = map(potValue, 0, 1023, 0, 180);

  // Use the potentiometer value as the base servo angle
  servoAngle = mappedAngle;

  // 2️⃣ If the "increase" button is pressed, add 90° to the angle
  if (digitalRead(buttonUpPin) == LOW) {
    servoAngle += 90;
    if (servoAngle > 180) servoAngle = 180;
    delay(200);  // Debounce delay
  }

  // 3️⃣ If the "decrease" button is pressed, subtract 90° from the angle
  if (digitalRead(buttonDownPin) == LOW) {
    servoAngle -= 90;
    if (servoAngle < 0) servoAngle = 0;
    delay(200);  // Debounce delay
  }

  // 4️⃣ Update the servo with the new angle
  myServo.write(servoAngle);

  // Debug: Print the current angle to the Serial Monitor
  Serial.print("Angle: ");
  Serial.println(servoAngle);

  delay(20);  // Small delay for smooth operation
}
📋 工作原理
- 电位器:
读取模拟值(0-1023)并将其映射到伺服角度(0°-180°)。 - 纽扣:
- 当。。。的时候 增加按钮 按下时,角度增加 90°。
- 当。。。的时候 减少按钮 按下时,角度减小 90°。
(内部上拉电阻和去抖动延迟有助于确保可靠的按钮按下。)
- 伺服控制:
伺服器的位置根据电位器读数和按钮调整不断更新。 - 串行监视器:
打印当前伺服角度是为了调试目的。
🎯 闭幕
此设置允许您使用电位器(用于平滑、连续调节)和两个按钮(用于快速、增量更改)控制 SG90 伺服器。这是一个很棒的项目,可以学习如何在 Arduino 上组合模拟和数字输入!
享受你的项目!😊👍