
🔹 Components Needed
✅ Arduino (Uno/Nano/etc.)
✅ SG90 Servo Motor
✅ Joystick Module (XY type, like KY-023)
✅ Jumper Wires & Breadboard
🔹 Understanding the Joystick
The joystick has two potentiometers (X & Y) and a push button:
- VRX (X-axis): Analog signal (A0)
- VRY (Y-axis): Analog signal (A1)
- SW (Button): Digital signal (D2, optional)
- VCC & GND: Power
For this setup, we’ll control the servo using the X-axis (left/right movement).
🔹 Circuit Connections
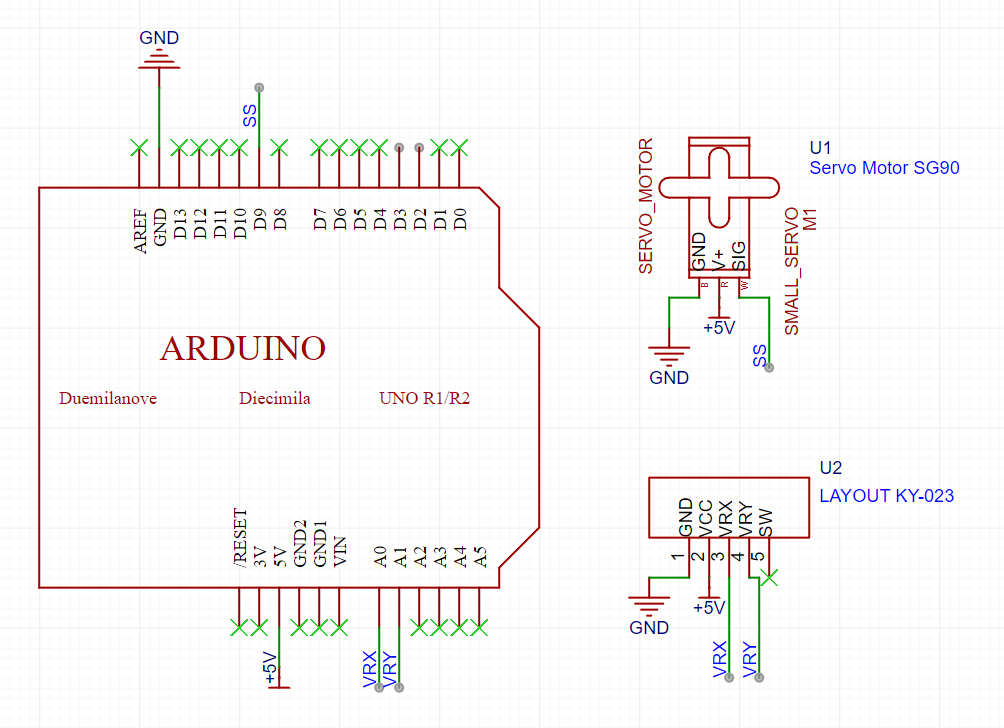
| Joystick Pin | Arduino Pin | Servo Pin |
|---|---|---|
| VCC | 5V | 5V |
| GND | GND | GND |
| VRX (X-axis) | A0 | — |
| VRY (Y-axis) | A1 (optional) | — |
| SW (Button) | D2 (optional) | — |
| — | — | Pin 9 (Servo Signal) |
🔹 Arduino Code (Joystick-Controlled Servo)
#include <Servo.h>

Servo myServo;
int joyX = A0;  // Joystick X-axis connected to A0
int xValue;      // Variable to store joystick reading

void setup() {
    myServo.attach(9);  // Servo on Pin 9
}

void loop() {
    xValue = analogRead(joyX);  // Read joystick X-axis (0-1023)
    int angle = map(xValue, 0, 1023, 0, 180);  // Convert to 0-180°

    myServo.write(angle);  // Move servo to the corresponding angle
    delay(15);  // Small delay for smooth movement
}
🔹 How to Test It?
1️⃣ Wire up the circuit as shown.
2️⃣ Upload the code to your Arduino.
3️⃣ Move the joystick left & right → The servo should move accordingly! 🎮🤖
🔹 What’s Next?
🔥 Add Y-axis → Control two servos (X for one, Y for another).
🔥 Use the button → Make it reset the servo to center (90°).
🔥 Upgrade to a robotic arm → Control servo-based grippers or a full arm!