🔹 Plan: How It Works
1️⃣ The Arduino R4 WiFi creates a web server.
2️⃣ A simple webpage (with buttons/sliders) controls the motors.
3️⃣ The Arduino reads button presses and moves the servo + stepper motors accordingly.
🔹 Components Needed
✅ Arduino R4 WiFi
✅ SG90 Servo
✅ 28BYJ-48 Stepper + ULN2003 Driver
✅ WiFi Network (Router or Hotspot)
🔹 Step 1: Connect Motors to Arduino
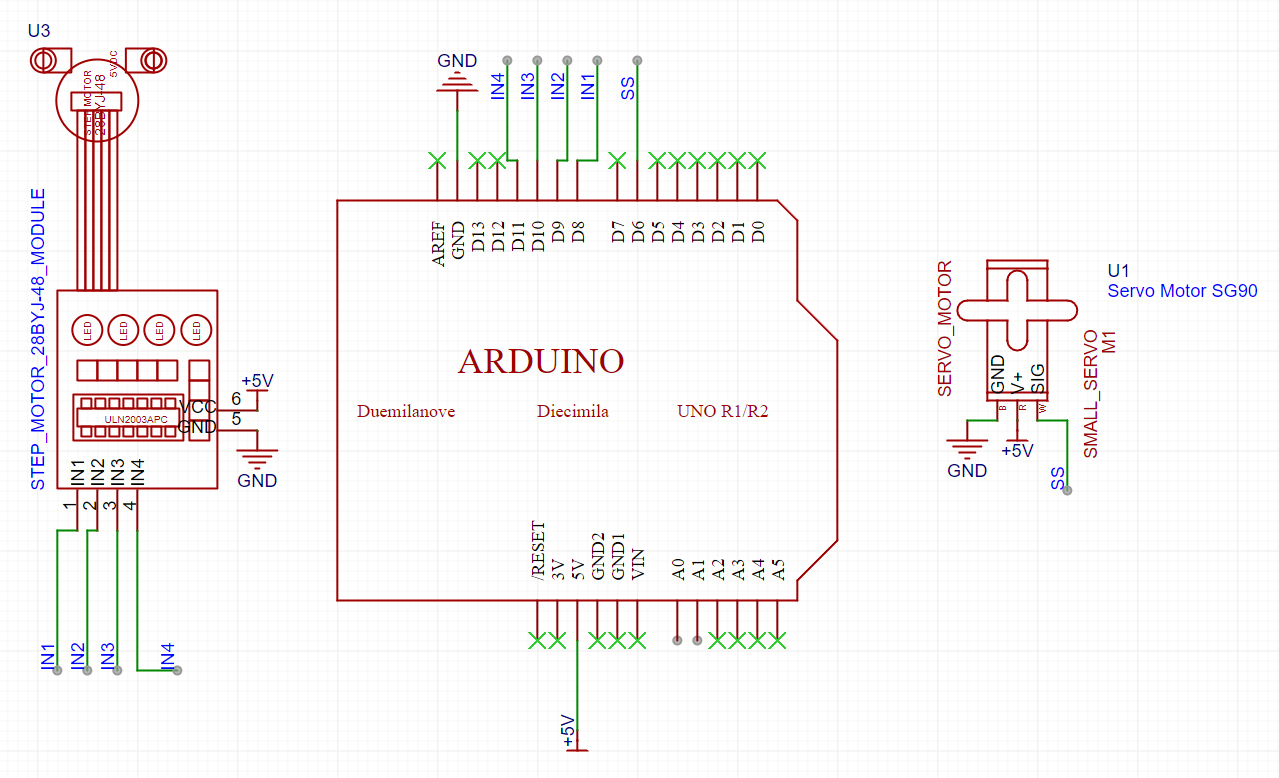
🔸 SG90 Servo
| Servo Pin | Arduino Pin |
|---|---|
| VCC (Red) | 5V |
| GND (Black) | GND |
| Signal (Orange) | Pin 6 |
🔸 28BYJ-48 Stepper (via ULN2003 Driver)
| ULN2003 Pin | Arduino Pin |
|---|---|
| IN1 | 8 |
| IN2 | 9 |
| IN3 | 10 |
| IN4 | 11 |
| VCC | 5V |
| GND | GND |
🔹 Step 2: Arduino Code (WiFi Web Server)
This code sets up a webpage with buttons to control both the servo and stepper motor.
#include <WiFiS3.h>
#include <Servo.h>
#include <Stepper.h>

const char* ssid = "YOUR_WIFI_NAME";      // Change to your WiFi
const char* password = "YOUR_WIFI_PASS";  // Change to your WiFi password

WiFiServer server(80);  // Start web server on port 80

Servo myServo;
const int stepsPerRevolution = 2048;
Stepper myStepper(stepsPerRevolution, 8, 10, 9, 11);

void setup() {
    Serial.begin(115200);
    myServo.attach(6);
    myStepper.setSpeed(10);

    // Connect to WiFi
    WiFi.begin(ssid, password);
    while (WiFi.status() != WL_CONNECTED) {
        delay(500);
        Serial.print(".");
    }
    Serial.println("Connected to WiFi!");
    Serial.println(WiFi.localIP()); // Print IP Address

    server.begin(); // Start web server
}

void loop() {
    WiFiClient client = server.available();
    if (client) {
        String request = client.readStringUntil('\r');
        client.flush();

        if (request.indexOf("/servo_up") != -1) {
            myServo.write(180);  // Move Servo UP
        } else if (request.indexOf("/servo_down") != -1) {
            myServo.write(0);  // Move Servo DOWN
        } else if (request.indexOf("/stepper_left") != -1) {
            myStepper.step(-50);  // Stepper Left
        } else if (request.indexOf("/stepper_right") != -1) {
            myStepper.step(50);  // Stepper Right
        }

        // HTML Webpage
        client.println("HTTP/1.1 200 OK");
        client.println("Content-type:text/html");
        client.println();
        client.println("<html><body>");
        client.println("<h2>Motor Control</h2>");
        client.println("<button onclick=\"fetch('/servo_up')\">Servo Up</button>");
        client.println("<button onclick=\"fetch('/servo_down')\">Servo Down</button>");
        client.println("<br><br>");
        client.println("<button onclick=\"fetch('/stepper_left')\">Stepper Left</button>");
        client.println("<button onclick=\"fetch('/stepper_right')\">Stepper Right</button>");
        client.println("</body></html>");
        client.println();
        delay(100);
    }
}
🔹 Step 3: How to Use It
1️⃣ Upload the code to your Arduino R4 WiFi.
2️⃣ Open Serial Monitor → It will show your IP address (e.g., 192.168.1.100).
3️⃣ On your phone or PC, open a web browser and go to:
👉 http://YOUR_IP_ADDRESS/
4️⃣ Click the buttons to move the servo & stepper wirelessly! 🎮✨
🔹 Next Steps & Upgrades
🔥 Use a slider to set the servo angle smoothly.
🔥 Add joystick-like buttons for stepper speed control.
🔥 Host a better-designed webpage with a mobile-friendly UI.