
🔧 Components Needed
- Arduino Board (e.g., Arduino Uno or Arduino R4)
- I2C LCD 1602 Display
- Jumper Wires
- Breadboard (optional)
📌 Wiring Connections
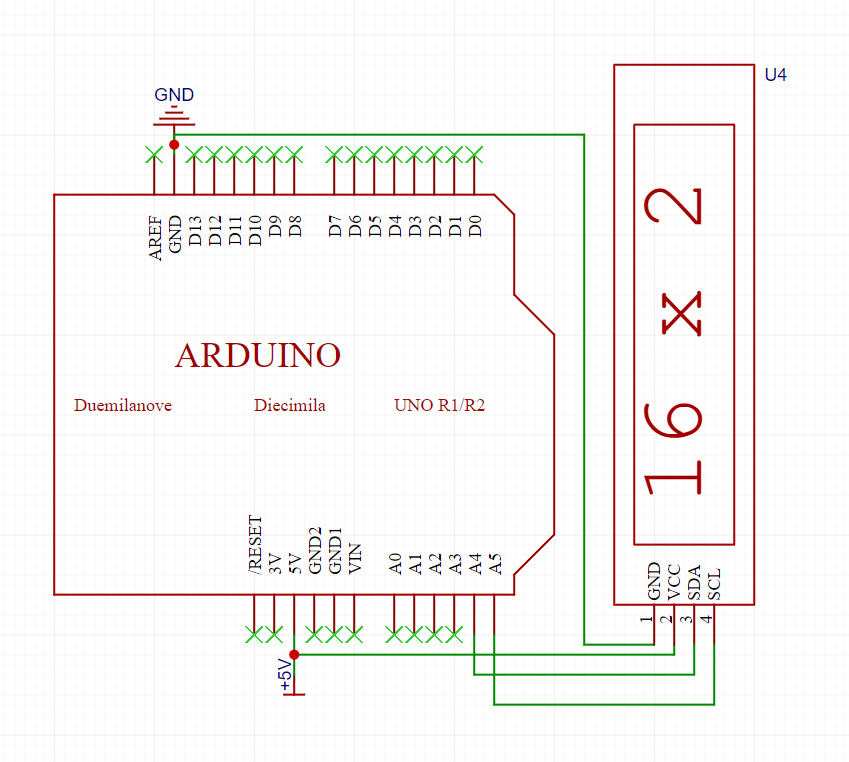
- I2C LCD 1602 Display:
- VCC: → Arduino 5V
- GND: → Arduino GND
- SDA: → Arduino A4 (on Uno) or corresponding SDA pin
- SCL: → Arduino A5 (on Uno) or corresponding SCL pin
Note: The typical I2C address for these displays is 0x27. Verify with an I2C scanner if needed.
💻 Code Example
This sketch uses the LiquidCrystal_I2C library. It will generate a random number between 1 and 100, then prompt you (via the Serial Monitor) to enter guesses. Based on your input, the LCD displays hints like “Too High!” or “Too Low!” until you guess correctly.
#include <LiquidCrystal_I2C.h>

// ----- LCD Settings -----
LiquidCrystal_I2C lcd(0x27, 16, 2);  // I2C address 0x27, 16 columns, 2 rows

// Global game variables
int secretNumber;
bool gameOver = false;

void setup() {
  // Initialize Serial Monitor
  Serial.begin(9600);
  while (!Serial) { ; }  // Wait for Serial to initialize (if needed)

  // Initialize LCD
  lcd.init();
  lcd.backlight();

  // Welcome message on LCD
  lcd.clear();
  lcd.setCursor(0, 0);
  lcd.print("Guess The Number");
  lcd.setCursor(0, 1);
  lcd.print("1-100");

  // Seed random generator using an unconnected analog pin
  randomSeed(analogRead(0));

  // Generate secret number between 1 and 100
  secretNumber = random(1, 101);

  // Prompt in Serial Monitor
  Serial.println("Welcome to 'Guess The Number'!");
  Serial.println("I'm thinking of a number between 1 and 100.");
  Serial.println("Enter your guess:");
}

void loop() {
  if (Serial.available() > 0 && !gameOver) {
    int guess = Serial.parseInt();
    if (guess == 0) return; // Skip if no valid number entered

    // Clear LCD for new message
    lcd.clear();

    if (guess < secretNumber) {
      lcd.setCursor(0, 0);
      lcd.print("Too Low!");
      Serial.println("Too Low! Try again:");
    }
    else if (guess > secretNumber) {
      lcd.setCursor(0, 0);
      lcd.print("Too High!");
      Serial.println("Too High! Try again:");
    }
    else {
      lcd.setCursor(0, 0);
      lcd.print("Correct!");
      lcd.setCursor(0, 1);
      lcd.print("You Win!");
      Serial.println("Correct! You win!");
      gameOver = true;
    }

    // Wait a moment before next input
    delay(1500);

    // If game not over, re-prompt on LCD
    if (!gameOver) {
      lcd.clear();
      lcd.setCursor(0, 0);
      lcd.print("Guess 1-100");
      Serial.println("Enter your next guess:");
    }
  }
}
📋 How It Works
- Game Initialization:
- The LCD shows a welcome message (“Guess The Number”) and indicates the range (1-100).
- A random secret number is generated using
random(1, 101).
- User Input via Serial Monitor:
- The player enters guesses in the Serial Monitor.
- The code reads these guesses using
Serial.parseInt().
- Feedback Mechanism:
- If the guess is too low or too high, the LCD and Serial Monitor provide feedback (e.g., “Too Low!” or “Too High!”).
- Once the correct number is guessed, a congratulatory message is displayed, and the game ends.
- Display Update:
- The LCD updates after each guess, ensuring that messages are clear even on the small 16×2 screen.
🎯 Enhancements & Ideas
- Reset Button:
- Add a push button to reset the game without restarting the Arduino.
- Score Keeping:
- Track the number of guesses and display the score.
- Multiple Levels:
- Introduce levels where the number range increases as the player wins.
- Custom Characters:
- Use custom characters on the LCD for fun icons (e.g., smiley faces when winning).
Enjoy building your retro, text-based game on the Arduino with the I2C LCD 1602! If you have any questions or need further tweaks, feel free to ask. Happy gaming! 😊🎮✨