How to Connect a Relay to Arduino
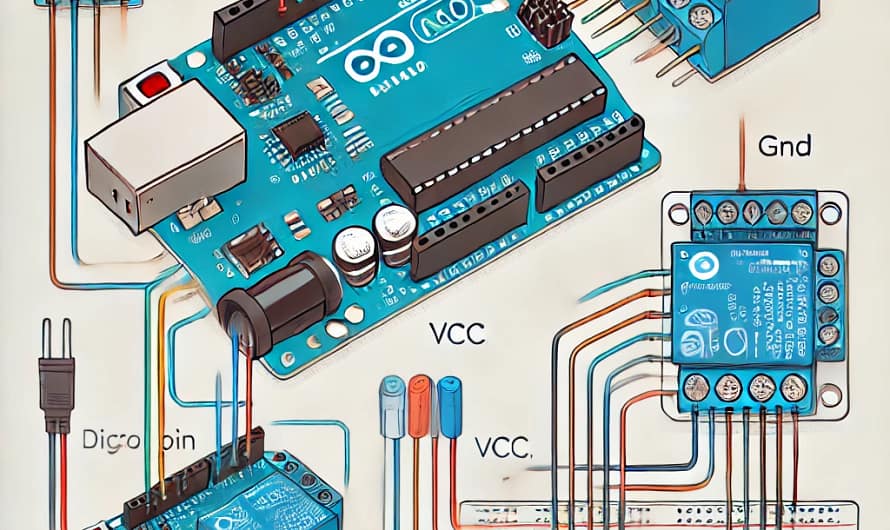
Materials Needed:  Wiring Diagram:
  Control Code:
  Important Notes:
Unravel the Mystery of Electronics

Complex circuits inside a single package.
Materials Needed: Wiring Diagram: Control Code: Important Notes:
 Controlling an SG90 Servo with Arduino Using a Potentiometer and Buttons
 Components Needed
  Wiring Diagram 1. Servo Connection (SG90) 2. Potentiometer Connection 3. Button Connections Tip: Use the Arduino’s internal pull-up resistors for the …

 Controlling your SG90 servo with a joystick will feel like operating a mini robotic arm! Let’s get started.
 Components Needed
  Arduino (Uno/Nano/etc.) SG90 Servo Motor Joystick Module (XY type, like KY-023) Jumper Wires & Breadboard Understanding the Joystick The joystick …
 Detailed ATtiny Simulation Programs
 Tinkercad Circuits
  Proteus Design Suite
  SimulIDE
  Atmel Studio (Microchip Studio)
  Virtual Breadboard (VBB)
  Final Thoughts Each of these tools …
 Let’s start with a simple robotic arm or leg movement using servo motors and an ATtiny85.
 Step 1: Components Needed Microcontroller – ATtiny85 Servo Motor – SG90 (small) or MG996R (stronger) Power Supply – 5V (for servos) Potentiometer (optional) …
Here’s a step-by-step guide on how to upload code to your Arduino using the Arduino IDE

Connect Your Arduino Open the Arduino IDE Select the Correct Board Select the Correct Port Verify (Compile) Your Code  …
…
Let’s start with a simple robotic arm or leg movement using servo motors and an Arduino. Step 1: Components Needed Microcontroller – Arduino Nano/Uno Servo Motor – SG90 (small) or MG996R (stronger) Power Supply – 5V (for servos) Potentiometer …
 Controlling the SG90 servo with a potentiometer
 Components Needed Arduino (Uno/Nano/etc.) SG90 Servo Motor 10kΩ Potentiometer Jumper Wires & Breadboard Circuit Connections Component Pin Connect To SG90 Servo Red …
 Arduino Uno: Overview
 1. History of Arduino Uno 2. Applications of Arduino Uno 3. Comparison with Other Arduino Boards
  Arduino Uno vs. Uno Clones …
What is a Microcontroller?A microcontroller (MCU) is a compact integrated circuit (IC) that functions as a small computer. It includes a processor (CPU), memory (RAM/ROM), and input/output (I/O) …


