
1️⃣ Requirements
- ATtiny Microcontroller (e.g., ATtiny85)
- Piezo Buzzer or Small Speaker
- Resistor (optional, to limit current)
- Battery or Power Supply
- Programming Setup: An Arduino as ISP (In-System Programmer) or a dedicated ISP programmer.
- Arduino IDE or other compatible AVR programming software
2️⃣ Circuit Setup
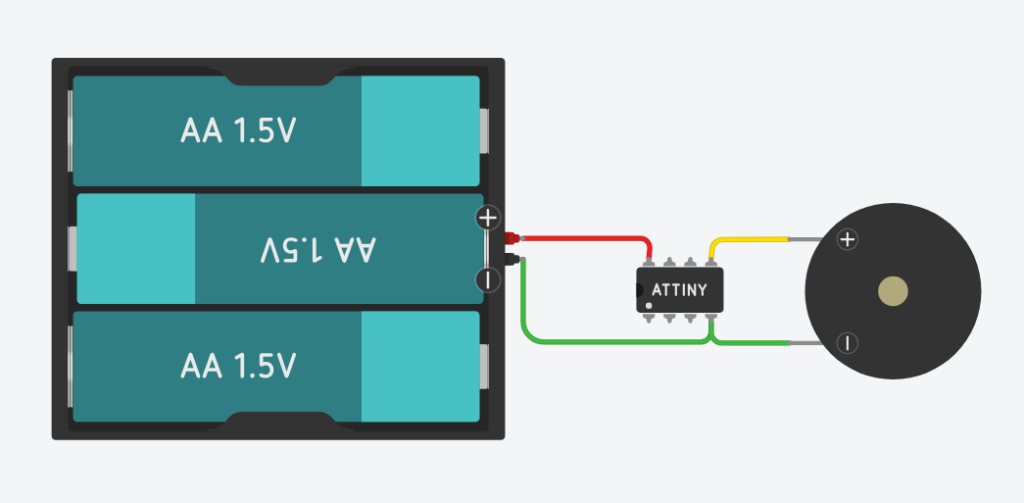
- Connect the Piezo Buzzer:
- Attach one terminal of the buzzer to one of the PWM-capable pins of the ATtiny (e.g., pin 0 on the ATtiny85).
- Connect the other terminal to the ground (GND).
- If using a speaker instead of a buzzer, include a resistor in series to limit the current and protect the ATtiny pin.
- Power Supply:
- Connect the VCC and GND pins of the ATtiny to your power source (typically 5V).
3️⃣ Programming the ATtiny
To generate music, you’ll be creating a sequence of tones by varying the frequency of the PWM signal output from the ATtiny. Here’s how you can write the code using the Arduino IDE:
Basic Sketch Example:
#include <avr/io.h>
#include <util/delay.h>

// Function to generate a tone
void playTone(int frequency, int duration) {
    int delayValue = 1000000 / frequency / 2; // Calculate delay in between toggles
    long numCycles = frequency * duration / 1000; // Calculate the number of cycles for proper timing

    for (long i = 0; i < numCycles; i++) {
        PORTB ^= 1 << PB0; // Toggle pin PB0 on and off
        _delay_us(delayValue); // Delay for a period of the tone
    }
}

int main(void) {
    DDRB |= 1 << PB0; // Set PB0 as an output

    while(1) {
        playTone(262, 250); // Play C note
        _delay_ms(250); // Delay between notes
        playTone(294, 250); // Play D note
        _delay_ms(250);
        playTone(330, 250); // Play E note
        _delay_ms(250);
        // Add more notes as needed
    }
}
Steps:
- Include Necessary Libraries: Use
<avr/io.h>for register and port definitions, and<util/delay.h>for delays. - Define the
playToneFunction: This function generates a square wave of the specified frequency and duration at pin PB0. - Main Loop: Play notes by calling
playTonewith different frequencies (corresponding to musical notes).
4️⃣ Uploading the Code
- Set up your ATtiny with an Arduino as ISP or another ISP programmer.
- Choose the correct board and port in the Arduino IDE.
- Upload the code to the ATtiny.
5️⃣ Considerations and Tips
- Power Efficiency: Make sure your battery or power source is suitable for long-term use if the device is not intended for short demonstrations.
- Sound Quality: The quality of sound will depend largely on the output device (buzzer vs. speaker) and the environment.
- Additional Features: Consider adding buttons or sensors to change the tunes or start/stop the music interactively.
Creating music with an ATtiny is a rewarding project that demonstrates the capability of even the smallest microcontrollers to perform complex tasks like sound generation. It’s a great way to learn about both the hardware and software aspects of microcontroller programming.