🎮🔥 How to control both the SG90 servo and the 28BYJ-48 stepper motor with the joystick. This is a great setup for a robotic arm or a turret-like system!
Joystick X-axis → Controls the stepper motor (left/right rotation).
Joystick Y-axis → Controls the servo motor (up/down movement).
🔹 Components Needed
✅ Arduino (Uno/Nano/etc.) ✅ SG90 Servo Motor ✅ 28BYJ-48 Stepper Motor + ULN2003 Driver ✅ Joystick Module (KY-023 or similar) ✅ Jumper Wires & Breadboard
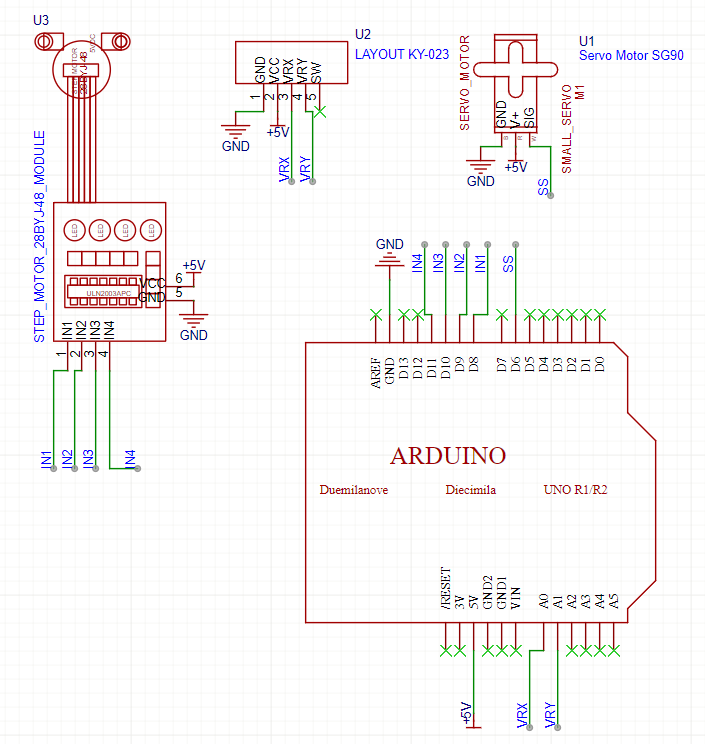
🔹 Circuit Connections
🔸 28BYJ-48 Stepper to ULN2003 Driver
Stepper Wire
ULN2003 Pin
Red
VCC (5V)
Blue
IN1
Pink
IN2
Yellow
IN3
Orange
IN4
Black
GND
🔸 ULN2003 Driver to Arduino
ULN2003 Pin
Arduino Pin
IN1
8
IN2
9
IN3
10
IN4
11
VCC
5V
GND
GND
🔸 SG90 Servo to Arduino
Servo Pin
Arduino Pin
VCC (Red)
5V
GND (Brown/Black)
GND
Signal (Orange)
Pin 6
🔸 Joystick to Arduino
Joystick Pin
Arduino Pin
VCC
5V
GND
GND
VRX (X-axis)
A0
VRY (Y-axis)
A1
🔹 Arduino Code (Joystick Control for Both Motors)
#include <Servo.h>
#include <Stepper.h>

const int stepsPerRevolution = 2048;  // Steps per full rotation for 28BYJ-48
Stepper myStepper(stepsPerRevolution, 8, 10, 9, 11);  // Stepper connected to pins 8,9,10,11

Servo myServo;  // Servo object

int joyX = A0;  // Joystick X-axis
int joyY = A1;  // Joystick Y-axis

void setup() {
    myStepper.setSpeed(10);  // Set stepper speed (adjustable)
    myServo.attach(6);  // Attach servo to Pin 6
}

void loop() {
    int xValue = analogRead(joyX);  // Read joystick X-axis (0-1023)
    int yValue = analogRead(joyY);  // Read joystick Y-axis (0-1023)

    // Control Stepper Motor (Left/Right Movement)
    if (xValue < 400) {
        myStepper.step(-10);  // Move stepper left
    }
    else if (xValue > 600) {
        myStepper.step(10);  // Move stepper right
    }

    // Control Servo Motor (Up/Down Movement)
    int servoAngle = map(yValue, 0, 1023, 0, 180);  // Convert joystick value to 0-180°
    myServo.write(servoAngle);
}
🔹 How It Works
Move joystick left/right → The stepper rotates left/right.
Move joystick up/down → The servo tilts up/down.
When centered, both motors stay in their current positions.
🔹 Next Steps & Enhancements
🔥 Smooth Stepper Movement: Instead of step(-10) or step(10), try map(xValue, 0, 1023, -50, 50). 🔥 Button Control: Add a button to reset both motors to their default position. 🔥 Speed Control: Use joystick press (SW pin) to switch between fast and slow movement.